Guitarists have been trying to emulate Jimi Hendrix since he burst his way onto the scene in the 60s. His style was so unorthodox that it seemed to be in a world of its own. Over time, guitarists have transcribed and analyzed Hendrix’s music in an attempt to better understand his approach.
In our opinion, the most intuitive way to learn his playing style is through the CAGED system.
In this article, we’ll:
- Show you each CAGED shape;
- explain how Hendrix used them in his music; and
- provide exercises inspired by classic Hendrix riffs.
You can also download a Guitar Pro file with all the TABS from this post.
What is the CAGED system?
The CAGED system is a way to visualize the fretboard using the five open chord shapes – C, A, G, E, and D. As you can see in the diagram below, each shape interconnects and, gives us five positions to play a single chord (in this case Cmaj).
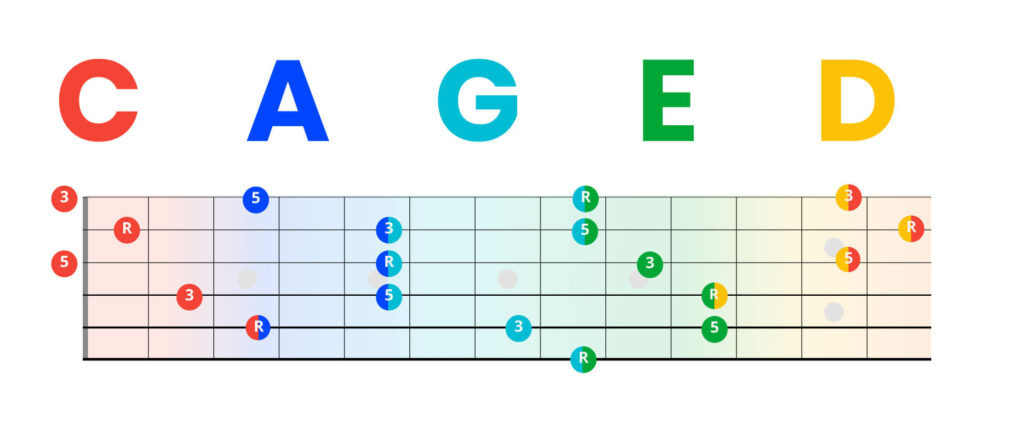
These anchor points help us find scales and arpeggios anywhere on the neck and in any key!
Jimi Hendrix took this principle and ran with it. It’s often hard to pinpoint exactly when he’s playing a chord or a scale– it all flows seamlessly into one beautiful sound. The intro to the iconic Little Wing is a perfect example of this style.
Learning the CAGED system will not automatically make you play like Hendrix. Many factors went into his legendary sound, but understanding some of the core CAGED principles will definitely get you closer. Before we get any further into the theory, let’s cover some Hendrixian essentials.
4 Tips to Sound More Like Hendrix
#1 – Use Single Coil Pickups
On the vast majority of his records, Hendrix played a Stratocaster – if you want his tone, this is the way to go.
There are plenty of resources out there for emulating his amp sounds, but without single coils, it’s never going to be quite right.
- A Stratocaster has a 5-way selector switch and each position gives a unique tone.
- Hendrix favored the neck pickup and position 4 (neck and middle).
#2 – Vary Your Strumming Position
Certain areas along the string have different tonal qualities, and Hendrix utilized this constantly. It’s not something many people think about when they play, so experiment with this and you’ll have a unique tonal tool in your belt!
Play close to the bridge for a brighter more trebly sound.
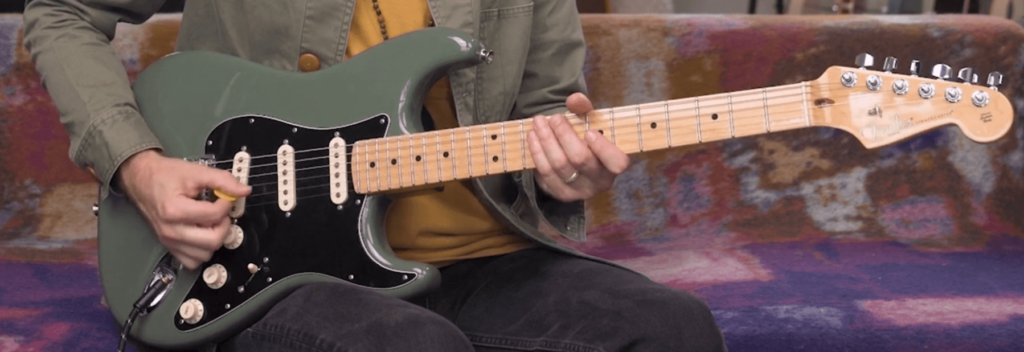
Play near the center of the string to achieve a warmer, fuller tone.
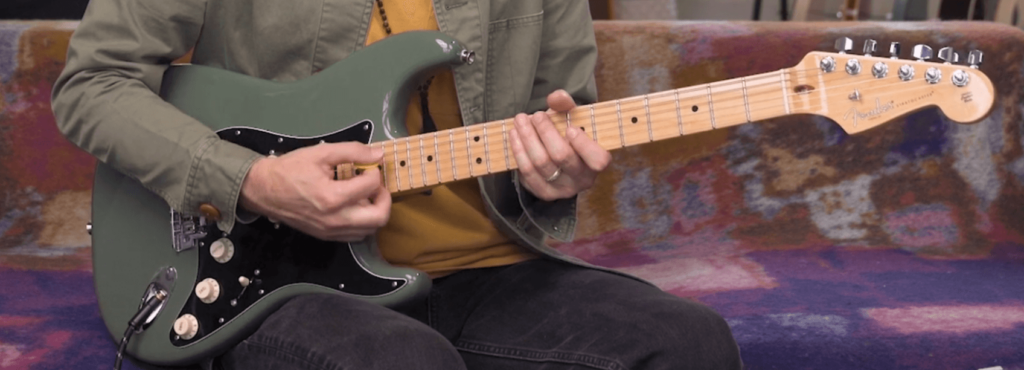
- Keep in mind that the center of the string varies depending on what note you’re playing.
- The area around the 12th fret is the center when playing an open string,
- The area around the 17th fret is the center when playing the 5th fret, etc.
#3 – Stay Relaxed
Hendrix could be heavy-handed during some lead playing, but most of his rhythm work was done with quite a light touch. One of the most important parts of his funky/bluesy sound was that laid-back style – keep your hands loose!
Always be mindful of the amount of power you use to hit the strings. This type of dynamic control will make your playing more expressive and emotional.
#4 – Get a Grip!
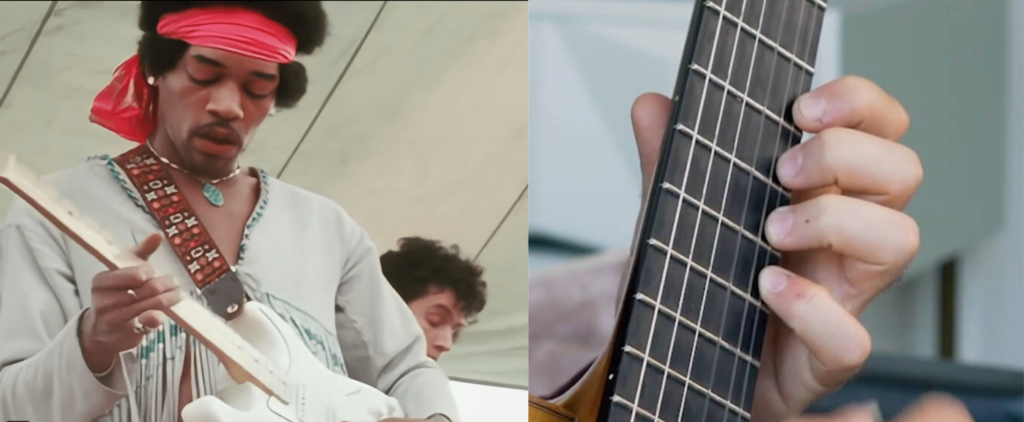
Image: Jimi Hendrix (Live 1969) remastered by ZOO HD
There’s quite a big difference between these two techniques of the fretting hand.
- On the right is the classical position, with the thumb placed on the back of the neck and fingers curved.
- Hendrix had a very different grip, with his thumb hanging over the top of the neck and fingers laying flat across the strings.
- This approach allows you to grab multiple strings with one finger – great for adding some wide vibrato to your double stops.
- Hendrix would use his thumb to hold down the root note on the low E string, freeing up his other fingers.
It’s likely that your grip is somewhere between these two styles, so hopefully, it won’t be too tricky to adjust. If using your thumb is a totally new concept, don’t worry! We’re going to show you how in just a moment.
It’s always a good idea to warm up before playing – especially when trying something new. Get your hands nice and loose with this finger stretching routine.
Hendrix Style CAGED Exercises
E Shape
We’re going to start with the E shape because it’s probably the easiest to visualize. Also, most of us are already familiar with the note names along the low E string – which is the root of this shape.

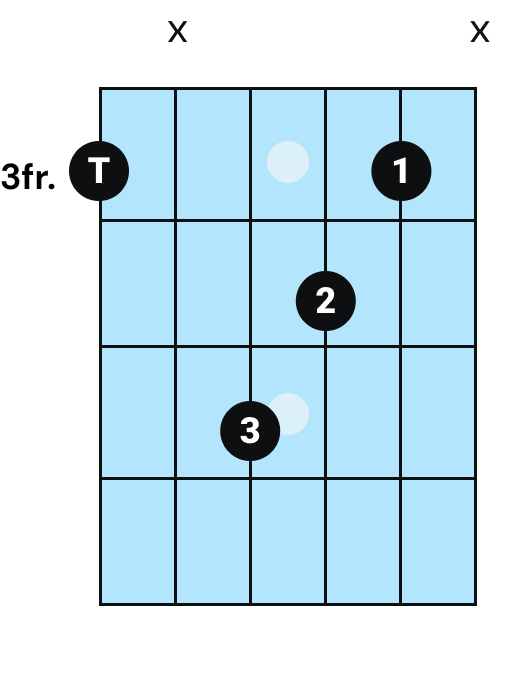
That’s just an E shape bar chord, right? Nothing unusual. Wrong! The ever-unorthodox Hendrix used his thumb to play the root note – here’s how:
the low E string
- 3 – Ring finger on the D string
- 2 – Middle finger on the G string
- 1 – Index finger on the B string
Now you know how it’s done, let’s understand why.
When we use our thumb to cover the bass note, it frees up our other fingers. This allows us to add embellishments around the chord shape.
Below is a diagram of all the toggle notes you can play with your free pinky finger. Instantly turn a triad into something more colorful by adding a 4th, 6th, or 9th interval.
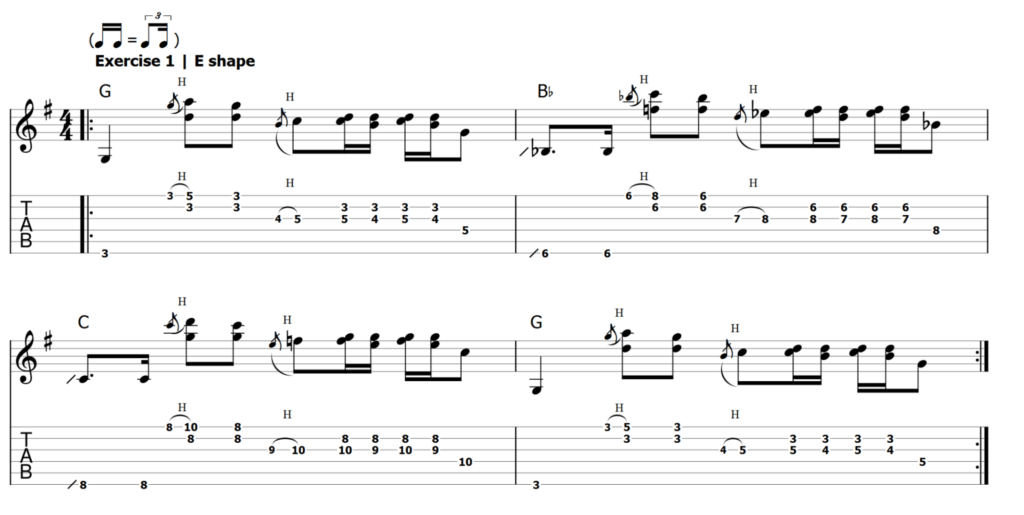
Okay, time to put it into practice. Let’s wing our way through this little exercise.
A Shape
If you know your bar chords, this shape will be a walk in the park. One important thing to note is that we have a triad in a perfect line across three frets on the D, G, and B strings. It’s a really useful little shape because it’s compact, and can be played with any finger – great for a position shift.

Don’t worry, we won’t make you wait until tomorrow for the next exercise.
Here we play the triad by barring our index finger across the 9th fret, we then add notes with hammer-ons and pull-offs.
This position is right in the middle ground between the A shape and G shape – you’ll see exactly what we mean in the next section.

G Shape

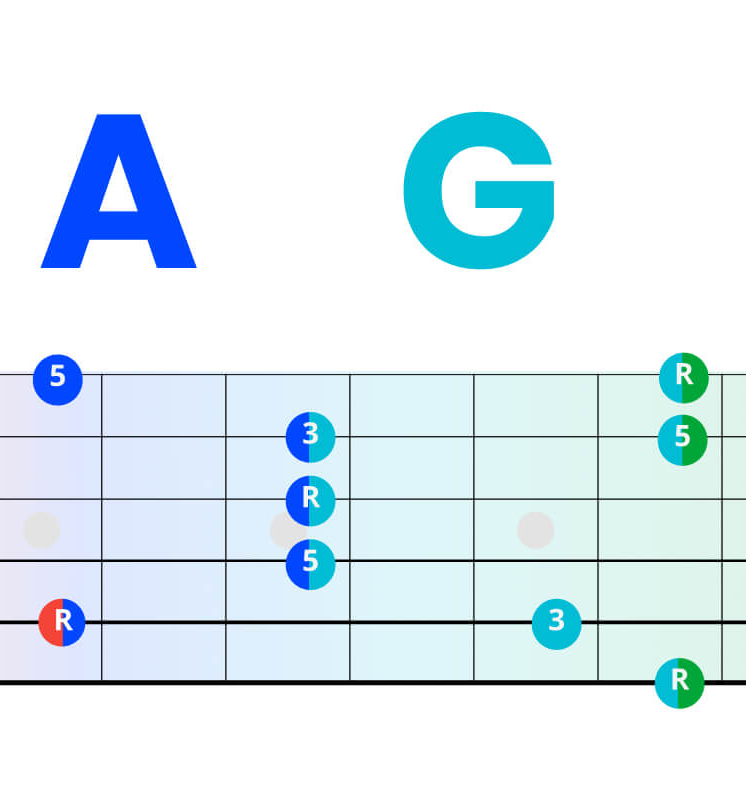
We mentioned that the A shape is great for a position shift, well the G shape showcases this perfectly.
You can see in the diagram below how these two CAGED shapes fit together, with that ‘5, R, 3’ triad sitting dead center. It’s really worth your time to practice transitioning between these two positions.
Our next exercise demonstrates how Hendrix flowed between these shapes to create iconic guitar parts, such as the intro to The Wind Cries Mary.
- The first three chords are just an A shape power chord with the 5th interval added to the low E string.
- We then shift our position to the G shape, hammering on the 3rd interval each time we move up a fret.
We’re not playing the full shapes, just fragments of them. Take a look at the tab below and try it for yourself.

It’s much easier to understand once you view it through the CAGED system, right?
C Shape

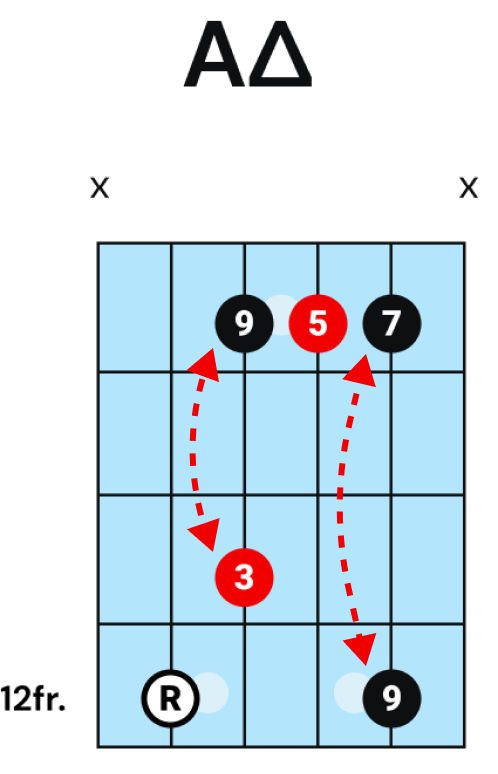
We’re going to look at a small section from Castles Made of Sand to help learn a bit more about how Hendrix would use the C shape. In the diagram below, we’re using the C shape and its root note is on the 12th fret of the A string – meaning this is an A major chord.
Try the exercise below. Make sure you visualize the chord shape on the fretboard as you’re playing and pay attention to those color notes we’re adding in. Seeing and understanding exactly what you’re playing is vital for mastering the CAGED system.

D Shape
This is perhaps the least popular CAGED shape but don’t let that put you off! If Hendrix found uses for it, we can too!

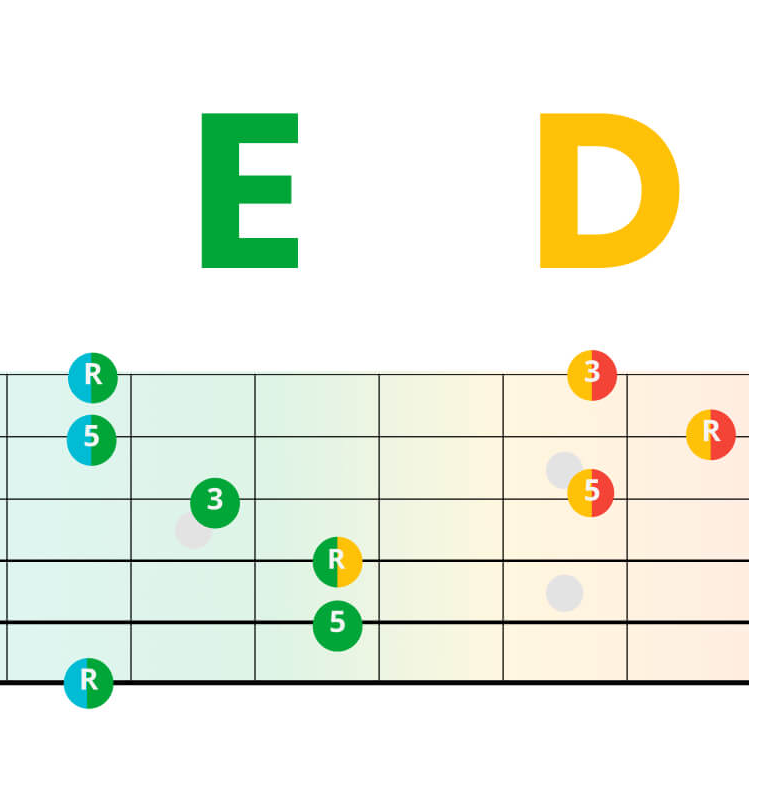
It may be more useful to think of the D shape as an extension of what comes before it – the E shape.
This next exercise demonstrates how Hendrix used the D shape to brighten up a riff based around the E shape.
Pay close attention to the last bar – this is where the D shape is used.

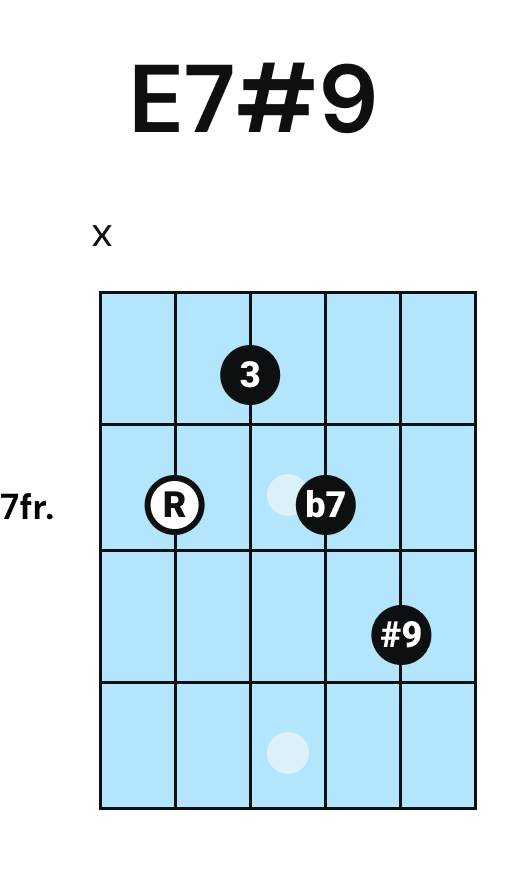
What is the ‘Hendrix Chord’?
In theory terms, the ‘Hendrix chord’ is a dominant 7th with a sharp 9th. It’s a unique sound – bluesy with a hint of dissonance.
- The construction is: root, 3rd, b7, and #9.
- You’ll hear this iconic sound used in many Hendrix songs – this example is inspired by Purple Haze.
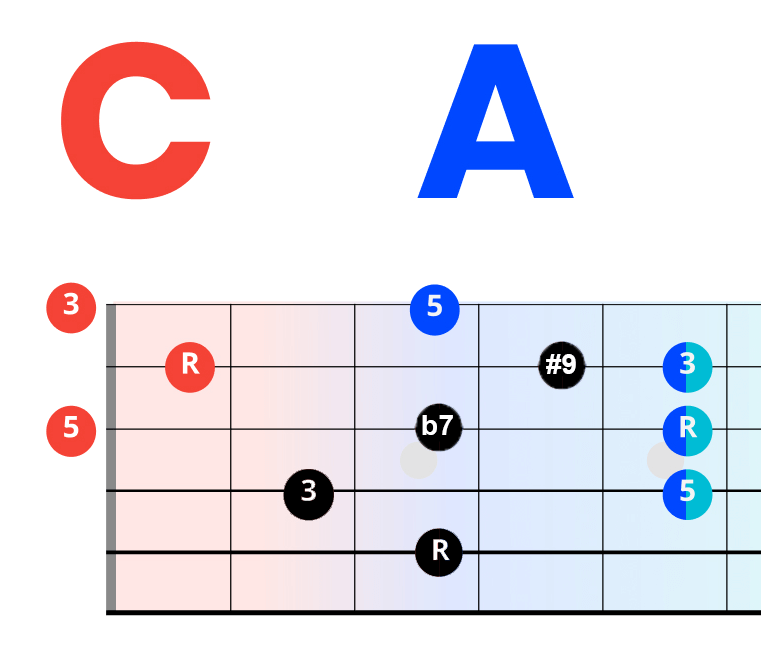
The big question is: How does it fit into the CAGED system?
This chord is a bit of an outlier – as you can see in the diagram below, it sits right between the C and the A shapes.
Bonus Exercise
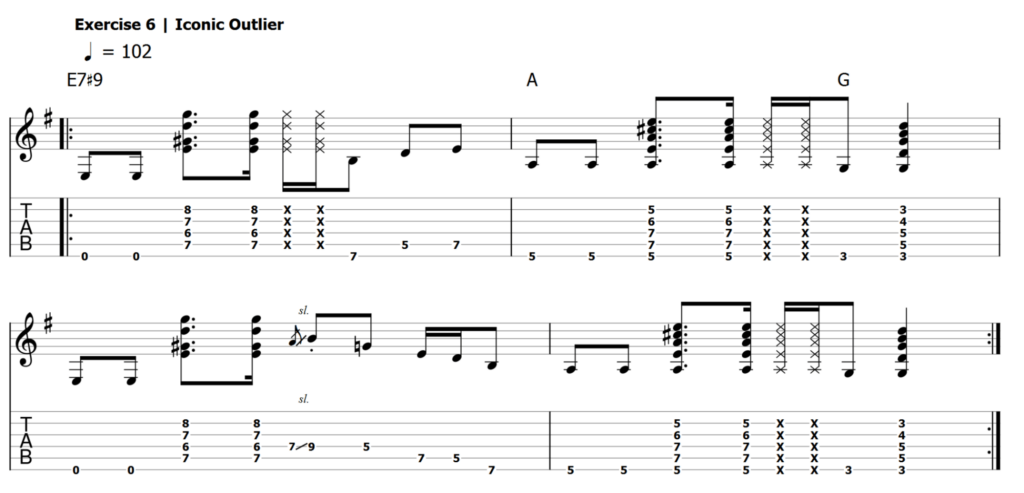
Here’s one last exercise for you. Practice grooving on the Hendrix chord and the E shape.
We’ve thrown a couple of Hendrix-isms in between the chords for good measure too – have fun!
Takeaways
We know Hendrix never learned the CAGED system as it wasn’t clearly defined at the time. That being said, it’s obvious he understood the connected nature of chords and scales across the fretboard.
- His stripped-down, triadic approach was rooted in these shapes.
- The way he visualized and navigated the fretboard was a precursor to the modern CAGED system – truly ahead of his time!
- One of the many benefits of learning the CAGED system is being able to analyze other guitarists.
While emulating Hendrix is no easy task, the CAGED system is a great way to get a glimpse inside his mind and gain a much deeper understanding of the instrument at the same time.
If you’d like to learn more, check out the brand new Hendrix CAGED Masterclass from Pickup Music. There’s a 14-day free trial so you’ve got no reason not to!
